8 Pentatonic Mini Positions For Easy Transposing (pt. 5/6)
So far in this series we’ve been working on one of the biggest traps of the guitar – being stuck in a position. In the case of pentatonic scales, it’s that A minor 5th fret box that most guitarist get stuck in. However, there are plenty more traps on this instrument, like how so many guitarists never learn any chords outside of the open position, or never bother to learn the names of the notes.
Another area we find ourselves stuck in, is certain guitar friendly keys. For example: E minor, C major, A minor and G major. Those keys sit so well on the guitar because of the tuning of the open strings.
To be clear, I have no problem with friendly keys, the open position, or the 5th fret pentatonic box. All of those things are fantastic, which is why they are so popular. I just always want to learn how to do more on this instrument, and in music in general, so naturally that curiosity leads to moving outside of those guitar comfort zones.
In this lesson, I’m going to show you how you can easily move your pentatonic scales to any key you like, so you can shed your A minor shackles and allow your solos to navigate the farthest corners of the entire chromatic universe.
(*note to self: remember to insert picture of person looking up at the stary night sky with shooting star and inspirational quote that says some shit about dreams or something)
THE COMMON APPROACH
Let’s start with the most common approach changing the key of the pentatonic scale. Let’s take our 5th fret A minor pentatonic position that we did last week and start there:
The first thing we need to be able to do to change the key, is find the root note in this position. In Fig.1a, the root note is an A, and that’s on the 5th fret of the six string. So as long as you know how to work out all the other notes along that 6th string, you can transfer this scale position into any other key key. If you don’t know how to name the notes on that string, check out this video, which goes into detail about how to do that.
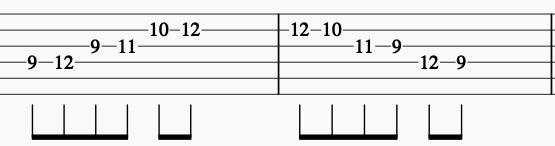
Today we’re going to focus on 4 of the most common minor keys on the guitar: A minor, E minor, D Minor, and B minor. Let’s start by moving it to E minor, which we touched on in the previous lesson. In that lesson, we talked about how the open string is an E, so the 12th fret is also an E (one octave higher). Now let’s move Fig.1a up to that 12th fret, like this:
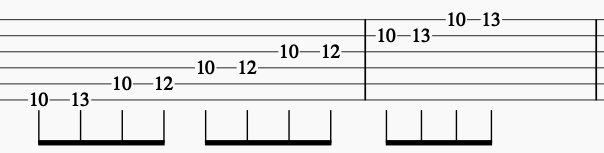
Now let’s move it to D. There’s a few ways we can find D. The easiest way is to take the E on the 12th fret, and go back 2 frets:
The final key we’re going to do is B minor pentatonic. A is on the 5th fret, so B is 2 frets higher than that. So take Fig.1a and move it up 2 frets:
That’s pretty much it for that approach – as long as you know where all of the notes are on the 6th string, you can just move that shape to any key you like.
A NEW APPROACH
While that approach we just looked at is great, it’s also limiting. You’re still stuck in a position, only now in multiple keys! You need another method if your goal is to become unstuck.
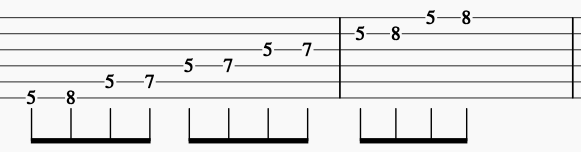
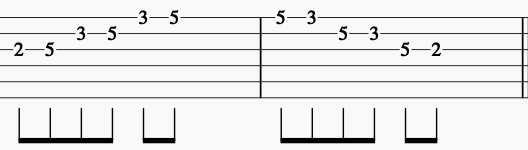
This time, we’ll use the same position of A minor pentatonic, but instead of playing the whole position, just play one octave of it – up and then down. Remember that the pentatonic scale only has 5 different notes in it? For example in Am – it’s A C D E G. This pattern is just that plus another A at the end:

As you can see, the notes go A C D E G A – with 2 notes on each string over 3 strings. The aim is to find this pattern in other areas of the fretboard, keeping with our 2 notes per string formula.
To find another position, you need to find another A to start from. There are a total of 11 or 12 A’s on the fretboard (depending on how many frets you have), but we won’t use all of them. You’ll see why later…
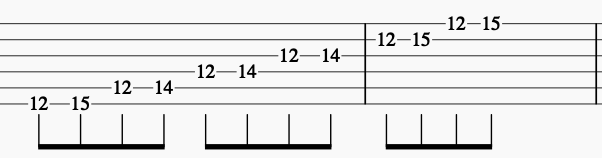
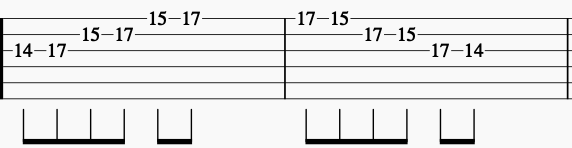
The easiest A to find now is 12 frets higher on the same string set. In this case, move to the 17th fret of the 6th string like this:
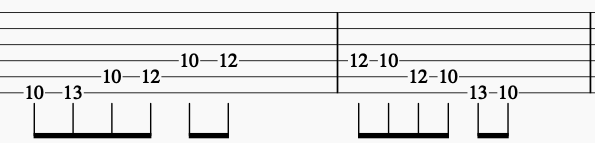
Now let’s move to the next string set. We’ll start from A on the 12th fret of the 5th string this time. You can now move Fig.2b to this new string set, like this:

To play the lower octave on this string set, this time shift this shape down 12 frets to the open position like this:
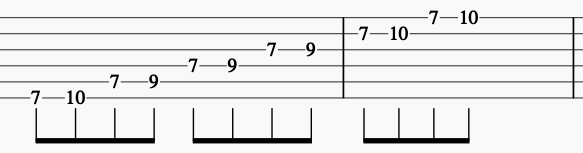
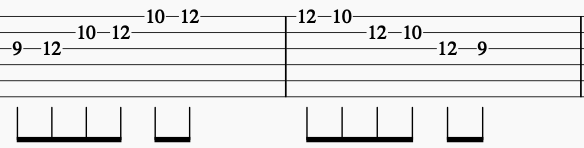
This method would be very simple if every shape ended up being exactly the same. However, because of the difference in tuning of the 2nd (B) string, it isn’t the case. Let’s try it from the 7th fret (A) of the 4th string:
Notice that the notes on the B string have been shifted up one fret due to the effect of the difference in tuning described above.
If you have a 22nd fret on your guitar, you can move this shape 12 frets higher:
For the next string set, start on the 2nd fret of the 3rd string:
Notice that both the notes on the B string and the E string are shifted up by one fret due to the effect of the difference in tuning on the B string.
And for the final pattern, take this shape 12 frets higher (14th fret):
Notice that we haven’t used every single ‘A’ note on the guitar. This is because our pattern spans 3 strings, so you can’t have your starting note on the B string or the high E string. Also, if you have 21 frets or less, you won’t be able to do Fig.2f.
Before moving on, play through all of the 8 patterns as a sequence in the order presented above.
TRANSPOSING PATTERNS STARTING ON THE 5th AND 6th STRINGS
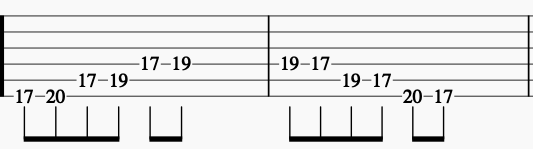
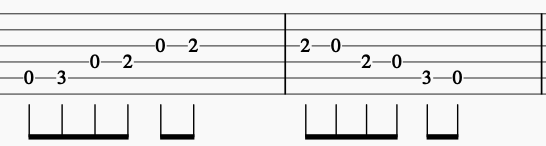
If you start on the 5th or 6th strings, all of the shapes will look the same, you just need to know where the root note is. You have both the upper and lower octaves on each string set, so that’s a total of 4 shapes. Here they are in E minor:


Let’s move all of those 4 shapes to B minor now. Just find those 4 B’s on the 5th string (2nd and 14th frets) and 6th string (7th and 19th frets) and play the patterns from there:


And then repeat this process for D minor. In this key, there is only one possibility on the 6th string set:

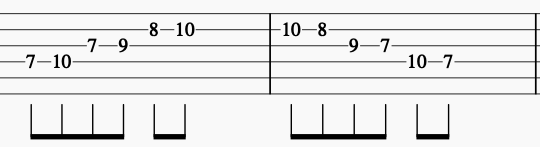
PATTERNS STARTING ON THE 3rd AND 4th STRINGS
Now let’s do the patterns on the other string sets.
Remember that with the pattern that starts on the 4th string, you have to shift those notes on the B string up by one fret (see Fig.2e). Similarly, with the patterns that start on the 3rd string, you have to move the notes on the B string and E string up by one fret (see Fig.2g).
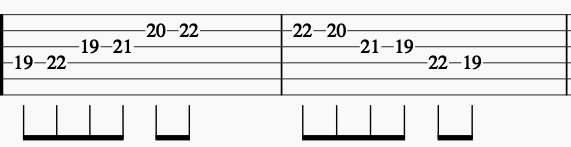
Here are all the patterns in the key of E minor, with one less pattern due to running out of frets on the 3rd string:

And here they are in B minor:

And finally in D minor:


IMPROVISING WITH THESE MINI POSITIONS
If you check out the video to go with this blog post, you will find an entire section dedicated to the topic of improvising with these patterns. In that section, I play a D minor vamp that you can improvise over. I also demonstrate an example of improvising over the same backing track to demonstrate how you might choose to approach this task.
I can’t recommend improvising enough in terms of getting new language into your playing.
FINAL THOUGHTS
Get these patterns off the page as quickly as possible so that you can start to memorise them. You don’t have to do all of them at once. You could pick one or 2 string sets and practise transposing them into other keys, making sure to improvise with them. A huge benefit of doing this is that you keep having to locate the root notes of each new key on different strings. Knowing where those notes are all over the fretboard is key to developing fluidly and independence in any key all over the fretboard.