The Pentatonic Scale on Single Strings (pt. 1/6)
The A minor pentatonic scale in the 5th fret position is arguably the most common entry point to improvising on the guitar. It’s friendly under the fingers, it’s satisfying to the ear, and you can pretty quickly start to approximate the sounds of your favourite blues and rock solos.
However, this position can become like a prison. You watch in horror as your life turns into a series of licks within this 4 fret area and you have no idea how to escape the dystopia you’ve created for yourself.
That’s because improvising melodic lines horizontally is a challenge on the guitar. So much so that it took me years before I’d even played every note of that scale on the entire fretboard. There ain’t that many. There’s around 10 notes on each string = approx. 60 notes in total.
As I sit here, it seems like such an obvious thing to do, but back then it just never occurred to me to even try to play all 60 notes. To be honest, it never occurred to me to find out how many there actually were. 60 is very achievable.
By the end of this post you will have played and improvised with all 60. Here’s your chance to waste a lot less time than I did on this simple, obvious yet elusive task. Let’s go!
The names of the notes
Although there are 60 notes, not all of them are different. Pentatonic means five sounds. So there are only 5 different notes, not 60. These are: A C D E G.
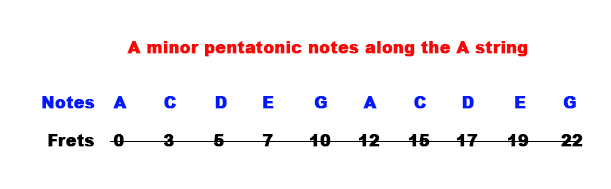
The 5th String
We’ll begin with the A string since A is the first note of the scale so I feel like that is a good enough place to start as any. The arrangement of the notes along this string is like this:
How to learn them so you actually remember them
1) Start with a small number of notes eg. start with the first 3 notes on this string
2) Jumble the order you play them in. This is very important. Most people learn scales going from the start to the end and then maybe going backwards as well. You’ll remember individual notes better if you mix up the order.
3) Improvise with them. Play notes more than once each. Try different rhythms. Try different articulations. Use bends, slides, hammer-ons and pull-offs.
4) Add (only) one more note. It doesn’t take long to know where 3 notes are. Particularly in this case since one of them is an open string. But don’t suddenly add 5. Just add 1 note. It takes patience but if you add a bit at a time, you’ll learn them quicker (Think –The Hare and the Tortoise).
5) Remember to explore many possible combinations of notes as you accumulate more. Let’s say you get to fret 15. Don’t just improvise with the 15th, 12th and 10th frets. Do big jumps like fret 15 to fret 3, or 15 to open. It’s more difficult to play huge jumps, so avoid just going from note to note in order of the scale. Because it is harder though, it’s a good idea to do the smaller intervals first and then try the larger jumps when you feel comfortable/ready.
6) BONUS (Only for people who want to be really good): Say the names of the notes as you play them. If you try this, don’t run before you can walk. Learning the names of the notes is another layer of difficulty. If it’s a challenge, do the physical stuff first and then try to say the names of the notes as you play them later. If it’s tricky, look at Fig. 1A above and read the names of the notes as you play them. If you really want to know how to name the notes, watch this.
7) Repeat this process for every string. Keep moving through the rest of the strings and repeat this process on each of them.
The intervals of the pentatonic scale
A ‘interval’ just means the distance between two notes. In another lesson we’ll be looking at more intervals, for now let’s focus on just 2 different ones.
Major 2nd – means that the notes are 2 frets apart.
Minor 3rd – means that the notes are 3 frets apart.
MAJOR 2ND INTERVALS IN A MINOR PENTATONIC SCALE:
C to D
D to E
E to G
G to A
MINOR 3RD INTERVALS IN A MINOR PENTATONIC SCALE:
A to C
E to G
There’s other intervals too, but for now we’re focussing on the ones where you go from note to note in the order of the scale. So just major 2nd’s and major 3rd’s. We’ll get to the others soon enough.
Why are we doing this? Because then you will be able to work out where the next note is if you know what note you’re on. Make sense?
For example, if you are on the 3rd fret of the 5th string, we know it is a C (see Fig. 1A). Now say you want to move to the next note in the scale. You can see that C to D is a major second. So that means that it’s 2 frets away. So you can move from that C (3rd fret) to the 5th fret and know it’s a D.
*Remember it like this: every note is 2 frets apart except A to C and E to G, which are 3 frets apart.
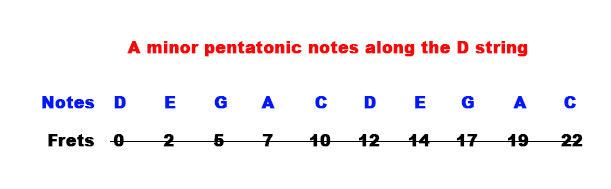
The 4th string
The notes on the 4th string are as follows:
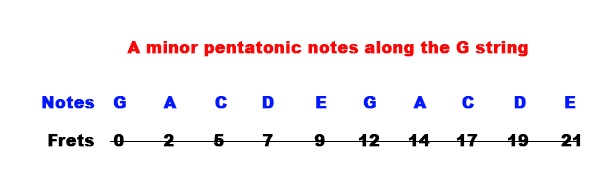
The 3rd string
The notes on the 3rd string are:
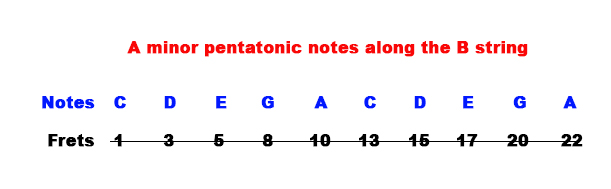
The 2nd string
Notice that this one does not use the open string. The notes are:
The 1st string and the 6th string
Both of these strings are E, therefore all of the notes are found in the same position on both strings (but they will sound 2 octaves apart).

FINAL THOUGHTS
1) Go through this exercise with the video first. A great way to complete this exercise the first time is to play along with the video. That way, you’ve played and improvised with all of the notes. After doing it once, the next time will be easier.
2) You don’t have to learn everything at once. Don’t be afraid of moving too slowly. Make it easy for yourself by doing things like:
- practise just one string on one day. Review it a bit the next day, then work on a different string
- Save learning the names until you can play all the notes on a particular string first. (make sure you get around to it though!)
3) Use the video as a practise tool. Slow down the video if you need to. Stop and start it as you wish.
4) Improvise over an A minor chord. Record yourself play an A minor groove and then practise improvising with these notes over the top.
Once you feel comfortable with this, move on to the next lesson in this series. Good luck and have fun!