
How to Practise the Major Scale
This lesson is the first instalment in a series on the major scale. If you’re unfamiliar with the major scale then that’s perfectly ok because we’re going to be starting from scratch. All that’s required is some very basic technique.
As we progress through the series, each lesson will build on the last so eventually we’ll get into some more advanced concepts for more advanced players. I’ll be sprinkling some theory dust throughout each lesson, but the focus will always be to give you new things that you can physically practise and make music with straight away.
The Open Position
The Open Position is the area of the guitar that most people learn first. That’s probably because it contains all those popular open chords that you hear in all of your favourite pop songs. One of those chords is called ‘C major’ (which is also referred to as plain old ‘C’).
The Open C chord works very well with the C major scale because it contains only notes that found in the C major scale. We’ll use the open C chord a bit later, but for now let’s learn the scale.
One Octave of C Major Scale
Let’s start with one octave of C major scale in the open position. That means we start on a low -pitched C and end on a higher-pitched C. Here are some simple rules about the fingering:
- 1st finger plays all notes on the 1st fret
- 2nd finger plays all notes on the 2nd fret
- 3rd finger plays all notes on the 3rd fret
If you’re unsure of the finger numbers: 1st finger is index, 2nd finger is middle, 3rd finger is ring. Stick to the rules for now.
Below is the TAB and music notation for this exercise. If you can’t read the TAB, check out the video for a demonstration of how to play it.

Now that you have the notes, try to memorise the whole scale. The best way to do this is by breaking it into chunks. Play the first 4 notes. Play them over and over again. Then add the next 2. Play all of that over and over again. Then add the last 2 notes. Now play the whole octave over and over again.
Once you feel comfortable with that, work on the backwards version:
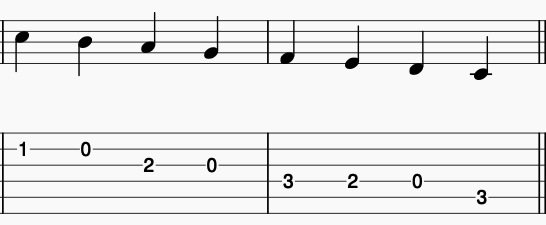
Same as before, take it bit by bit until you have all the correct notes in your memory.
Now we’ll add the open C chord. In Fig.1c, you start by playing the C chord, then you play the scale ascending, then descending, and finish with the C chord again. Avoid the urge to rush through it. Focus on note accuracy rather than playing it fast or in time (for now).
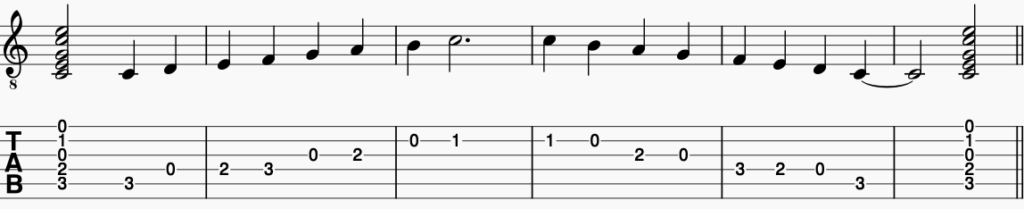
Can you hear how the C major scale works well with the C chord? Also, can you see how the notes of the C major scale in this position fit neatly around the open C chord? This aural and physical relationship between the scale and the chord will become increasingly important as you progress through these lessons.
Extending the position
So far we’ve been staying within a one octave range of the C major scale in the open position. That’s great, but there is more juice to squeeze out of this position. In fact, we’ve only learnt 8 notes but there are 9 more. Here is the complete pattern starting from the tonic, going to the highest pitch note in the position, then to the lowest pitch note in the position, then returning to the tonic:

You’ve already learnt a lot of Fig.1d already, so now just focus on memorising the new notes (bars 3 and 4, and 6-8). Like before, you can add the C chord to the beginning and end of the exercise once you can play the whole thing.
Knowing the names of the notes
If you can play that, here’s an easy way to name the notes. The music alphabet goes from A to G, like this:
A B C D E F G
After G, restart the alphabet again, like this:
A B C D E F G A B C D E F G A B C D E F G….
It just keeps on going like that. There’s a bit more to it, but let’s keep it simple for now.
Ok, let’s apply this to our notation. The scale begins on a C note. Then you just ascend the alphabet as you ascend the scale. Here is Fig.1d but now with the names of the notes shown as well:
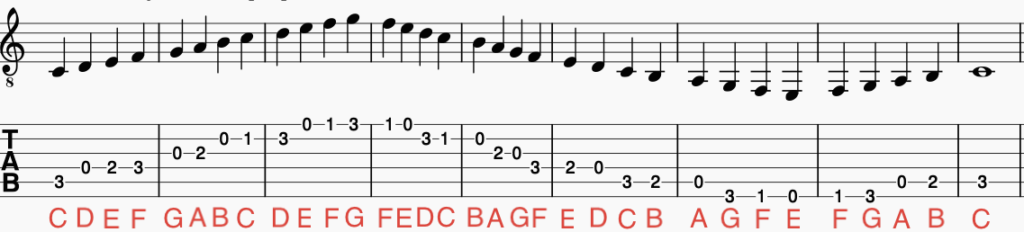
So that is kind of like a ‘cheat’ way of knowing the notes. But the thing is, the more you play a note and have it’s name in your head, the more you’ll remember it. So I would encourage you to take the time to say the name of the notes as you play them once you can play through the exercise. 99% of people won’t do this step because they’re lazy af.
If you really want to know how to name the notes, click here. It’s not that hard and the sooner you start, the better!
Bonus Step – Improvising
Playing the notes in order is one thing, but when you hear people actually using this material in their music, they don’t just run up and down the scale like we have today. If you want to turn your scales into music, you gotta mix the notes up. You can do this in 2 ways:
- Learning patterns
- Improvising
We’ll get to patterns in the next lesson, but let’s look at the improvising option a little bit.
The focus of this improvising-practise is not to play an awesome improvised off-the-cuff solo, but to get to know where the notes are better. To do this, simply mix them up. Pick 4 notes and then play them in different orders, repeat notes, play some fast, some slow. Then add more notes to those 4 and continue mixing them up. We’ll go deeper into this concept in upcoming lessons, but just keep it simple and spend some time at the end of your practise session mixing the notes up.
Final Thoughts
A lot of people understand the theory behind things, but actually putting the theory into practise is another thing altogether. I can work out what the notes are in most scales, but that doesn’t mean I’m equally fluent soloing in all of them. I get the theory, but if I want to get those weaker scales up to the same level as my strong ones, the only way is to practise those scales. A lot.
What I’m trying to say is not to skimp over this material. Practise every exercise. And don’t look at the tab and go ‘yeah, yeah, I get that.’ If you get it, prove it by playing it…smoothly. And with solid even timing.
Do that with all of the material we cover and you’ll be on your way.


One Comment
Comments are closed.