3 Scale Patterns Every Pro Knows
This lesson continues on from the previous one where you learnt C major scale in the open position. Today’s lesson introduces 3 patterns within that same position that will help improve your technique, understanding of the fretboard and ability to improvise.
Fragments of these patterns can be found in melodies and solos in music from a myriad of time periods, genres and locations. Furthermore, they can easily be adapted to other scales like melodic minor, harmonic minor, diminished, augmented, and so on and so forth. That means that once you know the notes of a particular scale, you can use these patterns to help you become fluent with those scales as well.

It’s recommended that you can smoothly and confidently play Fig.1 (taken from last lesson) before continuing with the patterns in this lesson, like this:
- Play the open C chord
- Play through Fig.1
- Play the open C chord again to finish the exercise
That’s it. If you can do that smoothly, move on to the next section.
Pattern 1 – The 1,2,3 Pattern
I call this first pattern ‘the 123 pattern’. Before taking it to the guitar, here is the pattern in numbers:
- 1 2 3
- 2 3 4
- 3 4 5
- 4 5 6
- 5 6 7
Can you see the pattern in this number sequence? You just count 3 consecutive numbers from number 1 (123), then you move to number 2 and count 3 consecutive numbers from there (234), the same again from number 3 (345), etc…
Now you might be asking – how does this relate to music?
Let’s organise the numbers into the context of the C major scale. C is the 1st note of that scale, so we’ll call it number 1. D is the 2nd note, so it is number 2, like this:
C D E F G A B
1 2 3 4 5 6 7
Now if we apply the 123 Pattern to the notes of the C Major Scale, we get this:
- C D E (1 2 3)
- D E F (2 3 4)
- E F G (3 4 5)
- F G A (4 5 6)
- G A B (5 6 7)
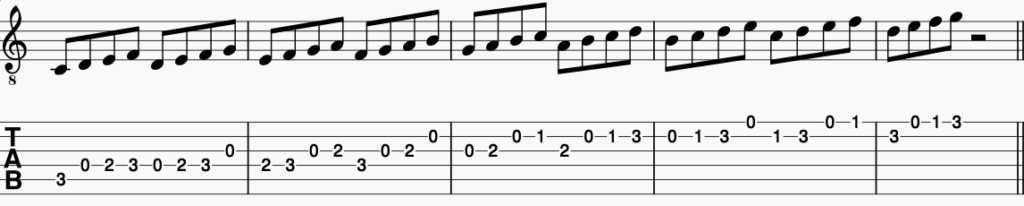
So that’s the logic of the pattern. Don’t worry if the theory doesn’t make complete sense yet – the more you do it, the more it will sink in. Now let’s step out of theory land and get into something you can actually play. Here is the complete pattern in the open position:

Now, when you look at this notation, are you able to identify the notes in the first red circle of Fig.2 as CDE? If not, that’s absolutely fine, but I encourage you to work on improving your ability to name the notes because you will find it extremely beneficial. Click here if you need help with naming the notes.
I’ve circled the first 3 groups. The first group is CDE, the 2nd is DEF and the 3rd is EFG, and the rest of the exercise continues to follow that patten. To learn this exercise properly, spend time on each group individually, like this:
- First learn the the first group (C D E) ie. play it a bunch of times
- Then learn the second group (D E F)
- Then put them together with a gap between each group (C D E…pause…D E F)
- Learn the next one (E F G)
- Then put all of that together, with gaps (C D E…pause…D E F…pause…E F G)
Continue that process all the way to the final note (3rd fret 1st string). Learning it bit by bit like this will help you to remember it better, and you’ll most likely make a lot less mistakes that you have to waste time fixing later.
Once you can play the whole thing, repeat it a bunch of times and start to slowly get rid of those gaps. If you’re nailing it, then it’s time for the backwards version of this exercise – 3 2 1.
Backwards
Here is the order of notes in the backwards pattern:
- B A G (7 6 5)
- A G F (6 5 4)
- G F E (5 4 3)
- F E D (4 3 2)
- E D C (3 2 1)
Start from the last note of Fig.2 (3rd fret 1st string – high G) and keep going from right to left. The first group goes GFE, next is FED, the EDC, DBC and so on.
Use the same process as before, ie. take it one group at a time. Pretty soon you’ll have the whole pattern all the way to the tonic. Now you can try to play it forwards and backwards, from low C to high G and then backwards from high G to low C.
For a complete TAB worksheet of this lesson, which includes the backwards versions of these exercises, click here. If you do use the TAB, try to get off the page as quickly as possible. Internalising this stuff now will help you for what’s coming in future lessons.
Extending the pattern
So far we haven’t gone the full range of the position with this pattern. Our ascending pattern does go to the highest note in the position (3rd fret, 1st string), but the descending pattern only goes back to the tonic (3rd fret, 5th string).
You can also extend it all the way to the low E as we did with the scale then ascend back up to the tonic like we did with the full scale in Fig.1. Once you feel comfortable, you can practise the whole thing like this:
- Play the C chord
- Ascend the pattern from low C to High G
- Descend the pattern from high G to low E
- Ascend from the Low E to the starting note – low C
- Play the C chord again
Pattern 2 – The 1,2,3,4 Pattern
If you learnt the first pattern well, this pattern will feel like a natural extension of pattern 1. This time play 4 consecutive notes from the tonic (CDEF) instead of 3, and then repeat that pattern starting from every note in the scale, like this:
- C D E F
- D E F G
- E F G A
- F G A B
- G A B C
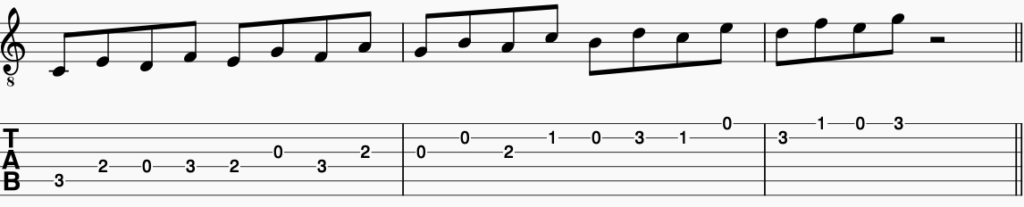
Here is the complete ascending pattern:
Once you’ve worked on that using the same method as you did with the 123 pattern and you feel like you’re smashing it, try the descending pattern:
- G F E D
- F E D C
- E D C B
- D C B A
- C B A G
- B A G F
- A G F E
- G F E D
- F E D C
Then continue all the way to the tonic:
- E D C B
- D C B A
- C B A G
- B A G F
- A G F E
Then ascend back to the tonic (3rd fret, 5th string):
- E F G A
- F G A B
- G A B C
As with the 123 pattern, play the C chord at the beginning and the end of the exercise. And that’s it!
Pattern 3 – The 3rds pattern
This pattern is a bit different, instead of playing the notes consecutively, it goes like this:
(1 3), (2 4), (3 5), (4 6), (5 7), (6 1)
So it’s like we skip every second note (ie. we go from 1 to 3, without playing 2), then we start the next group from the note we skipped (so after playing 1 to 3, we play note 2, then skip to note 4). You can think like this: ‘skip one, back one, skip one, back one…’ if that makes sense.
Here is a whole octave presented using the letters:
- C E
- D F
- E G
- F A
- G B
- A C
And here is one octave backwards:
- C A
- B G
- A F
- G E
- F D
- E C
And here’s the complete ascending pattern:
I’ll leave it up to you to figure out the full position using this pattern, or to get it from the PDF.
After working on each part separately, follow the same steps as before to complete the pattern:
- Play the chord
- Ascend the scale from low C to High G
- Descend the scale from high G to low E
- Ascend from the Low E to the starting note – low C
- Play the C chord again
And that’s it. Work on these 3 patterns in the open position until you feel you can’t get it wrong. That will set you up very well for the material in future lessons!