15 A Minor Chords From Just 3 Shapes
This lesson follows on from the previous lesson, so do that one first. In that lesson, we focussed on major triads. This follows the same process, but with minor triads.
The reason for presenting this material in the keys of C major and A minor is because they’re easy keys to learn in. The broader goal, however, is to transpose these chords into all the other keys as well. The result is that you’ll have 15 major and minor chord shapes spanning the entire fretboard in all 12 keys.
If that sounds like a lot to you, don’t worry. Today we’re sticking with just one key – A minor. But I guarantee you that as long as you work on these 2 lessons properly, you’re going to find transposing these chords far simpler than you might think.
Ok…let’s go!
A Minor Triads
A minor is ‘the relative minor’ of C major. This basically just means that the 2 chords are very closely related. The’re related because they’re both made up of almost exactly the same notes.
Here are the notes that make up C major:
C E G
Now here are the notes that make up A minor:
A C E
Can you see the difference between them?
They both have a C and an E, but C major has a G, while A minor has an A. That means that you could take any of the C major triads you learned in the last lesson and change the G note to an A note and you will have an A minor triad.
You could do that (and it is a great idea), but today we’re going to use the process we used in the last lesson. That means it’s back to talking about parent chords and babies again.
Note: Remember from last lesson that when you see the symbol for a major chord, it usually won’t have the word ‘major’ in it. For example, if the chord is C major, you can just write ‘C’.
If the chord is minor, there always has to be another symbol in front of the letter. The most common symbol used for minor is a lowercase ‘m’. So A minor becomes ‘Am’. From here on in this post, I’m going to refer to A minor as Am.
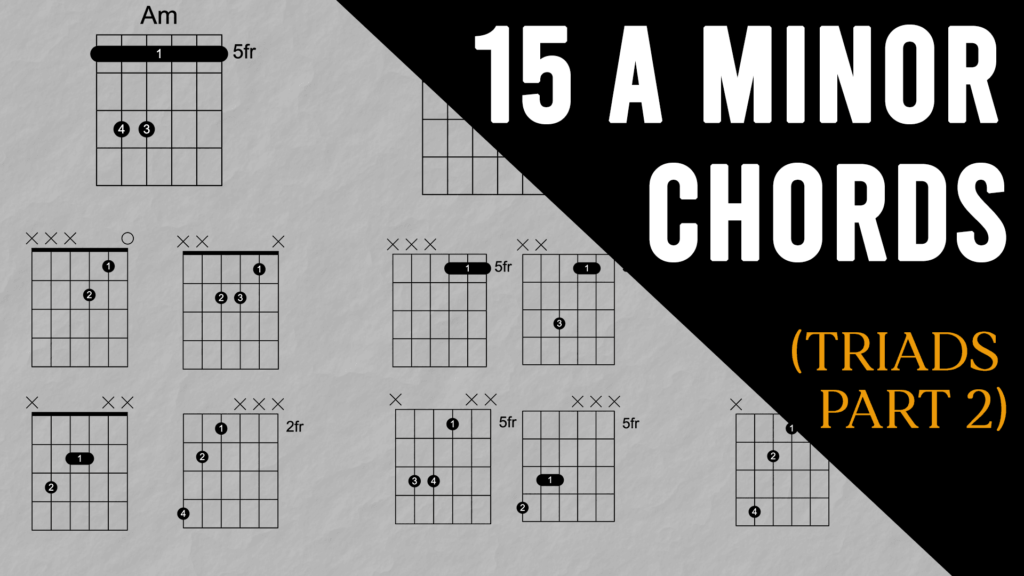
The 3 Am Parent Chords
Let’s have a look at our 3 new parent chords:
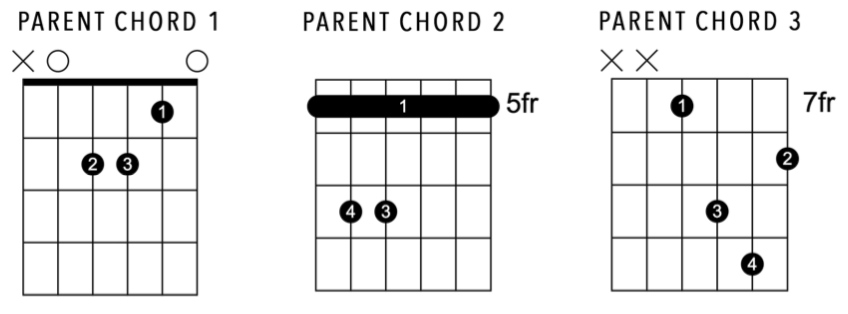
The first chord (from the left) in Fig.1 is the most common Am chord people know. It’s one of the first chords most guitarists learn, so I assume you can already play this if you’re doing this lesson.
The 2nd Am chord in Fig.1 is a 6 string minor barre chord. This barre chord is trickier than the 6 string major barre chord (from last lesson) because the barre needs to cover the 3rd string, which falls right under the knuckle joint. Check out these 2 videos on barre chords if you need help with this chord or barre chords in general:
The 3rd chord in Fig.1 is a lot less common and is based on the open D minor chord. It’s not too difficult, but it can be tricky to change to this chord quickly from another chord.
Don’t get slowed down by trying get all the parent chords perfect right now. The goal is to know where all the chords are first, and then to practise them so that eventually you can play them all to a similarly high standard. Some chords just take longer to master than others, so for this lesson think quantity first (learn all 15 chords), and then quality as a longer term goal (spend more time perfecting the ones you struggle with).
The Open Am Parent Chord
Every Am chord is made up of the notes A, C and E.
The open Am chord is no exception.
It’s a 5 string chord that has 2 A’s in it (on the 5th string and 3rd string), 2 E’s (4th string and 1st string) and one C (2nd string). So there are 3 different notes, but some of them are doubled.
Remember – all triads contain 3 different notes but you can have as many of the same notes as you like. If a chord has 15 A’s, 12 C’s and 95 E’s, it’s still an Am triad. Yes, I realise it’s a ridiculous example because you could not play that on any one instrument, but imagine a huge orchestra with 120 people playing just those notes. You would still call that chord an Am triad.
We’re going to derive 4 Am triads from this open Am chord. These baby triads don’t have any doubled notes – just one A, one C and one E. Here they are below in Fig.2:

Make sure you only put down the necessary fingers for each chord. That means – don’t just hold the parent chord shape when playing through the baby chords in Fig.2. Move through Fig.2 from left to right, holding down only the necessary fingers shown in each chord shape.
Once you get comfortable with playing Fig.2 from left to right, play it from right to left. If you’re feeling up to it, use your fingers instead of the pick as explained in the last lesson and in this video.
You should aim to memorise this chord sequence and to play it with fluency so there are no hesitations going from one chord to the next. If there’s a chord change that’s troubling you, spend more time on it than the others.
The 5th Fret Am Parent Chord
We’ve already talked about the difficulty of playing this parent chord, so let’s move right on to extracting 4 babies from it:
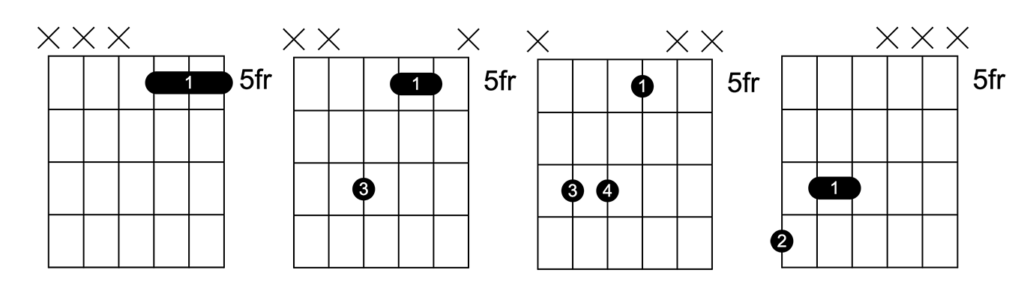
The process for this set of chords is the same as before. Allow your hand to flow from one chord shape to the next, always thinking of the next chord. For example, the first chord is just a 1st finger barre, so while you’re holding that down, start preparing your 3rd finger to be ready play the second chord.
Try this sequence to help memorise these chords:
Play the parent chord. Then play Fig.3 from left to right. Then play the parent chord again.
and/or:
Play the parent chord. Then play the exercise from right to left. Then play the parent chord again.
The 7th Fret Am Parent Chord
Let’s continue by applying our process it to this final set of chords:
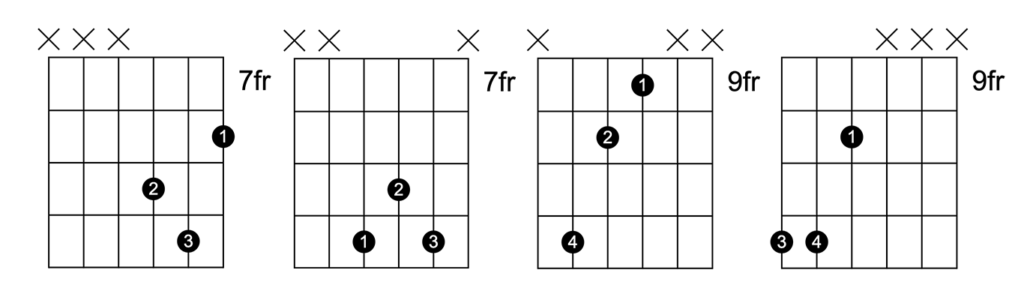
To help memorise them, look for similarities. For example:
Check the 4th chord in Fig.4. Now have a look at the 3rd chord in Fig.3. Notice anything?
These 2 chords are on different string sets, but they use the same shape.
Same with chord 3 in Fig.4 and chord 4 in Fig.2.
It doesn’t matter what key you’re in, these shapes will come up again and again, so get familiar with them. Compare them with the major shapes in the last lesson.
SOME FINAL THOUGHTS ON PRACTISING THIS STUFF:
- Work on your ability to play all of the C major and A minor parent chords. Some are trickier than others. It takes time to master barre chords, but you have to just keep showing up and working on them a bit each day. Not too much that you want to throw your guitar off a cliff, but do it consistently every day and you will be able to play them. How long it takes depends on how consistent you are.
- Aim to eventually play through each set of chords like it was a piece of music that you were playing for an audience. In other words, make it sound great. If your technique in either or both hands is stopping you from changing between 2 particular chords smoothly, work on it by going over those 2 chords again and again. And slow down.
- Memorise each set of triads from left to right and right to left. If you memorise these properly, changing to other keys will be easy. If you don’t, it will slow you down later on.
Have fun!